在本文中,我们将基于 Jetpack Compose 自定义布局,实现一个下拉动态渐变切换布局。最终实装的效果如下:

效果图(UI 布局部分参考自谷歌翻译)
更细致的描述,就是 A 页面下拉拖动时,B 页面开始从某一位置淡出,直至覆盖全屏。最终实现的布局代码,格式化后的代码不超过 70 行,一定程度上也体现出 Jetpack Compose 中自定义布局的简洁性。
您可以到 这里 下载 APK 体验上图效果
前置知识
阅读本文可能需要您拥有一定的相关知识,比如:
- 熟悉 Kotlin 的基本语法,比如高阶函数等
- 对 Jetpack Compose 有一定了解,比如自定义布局的基本流程、
Modifier 的使用等
如果您对上述知识不了解,可以参考 官方教程、Android Developer 频道相关视频 或 Compose-Museum。
此布局细节
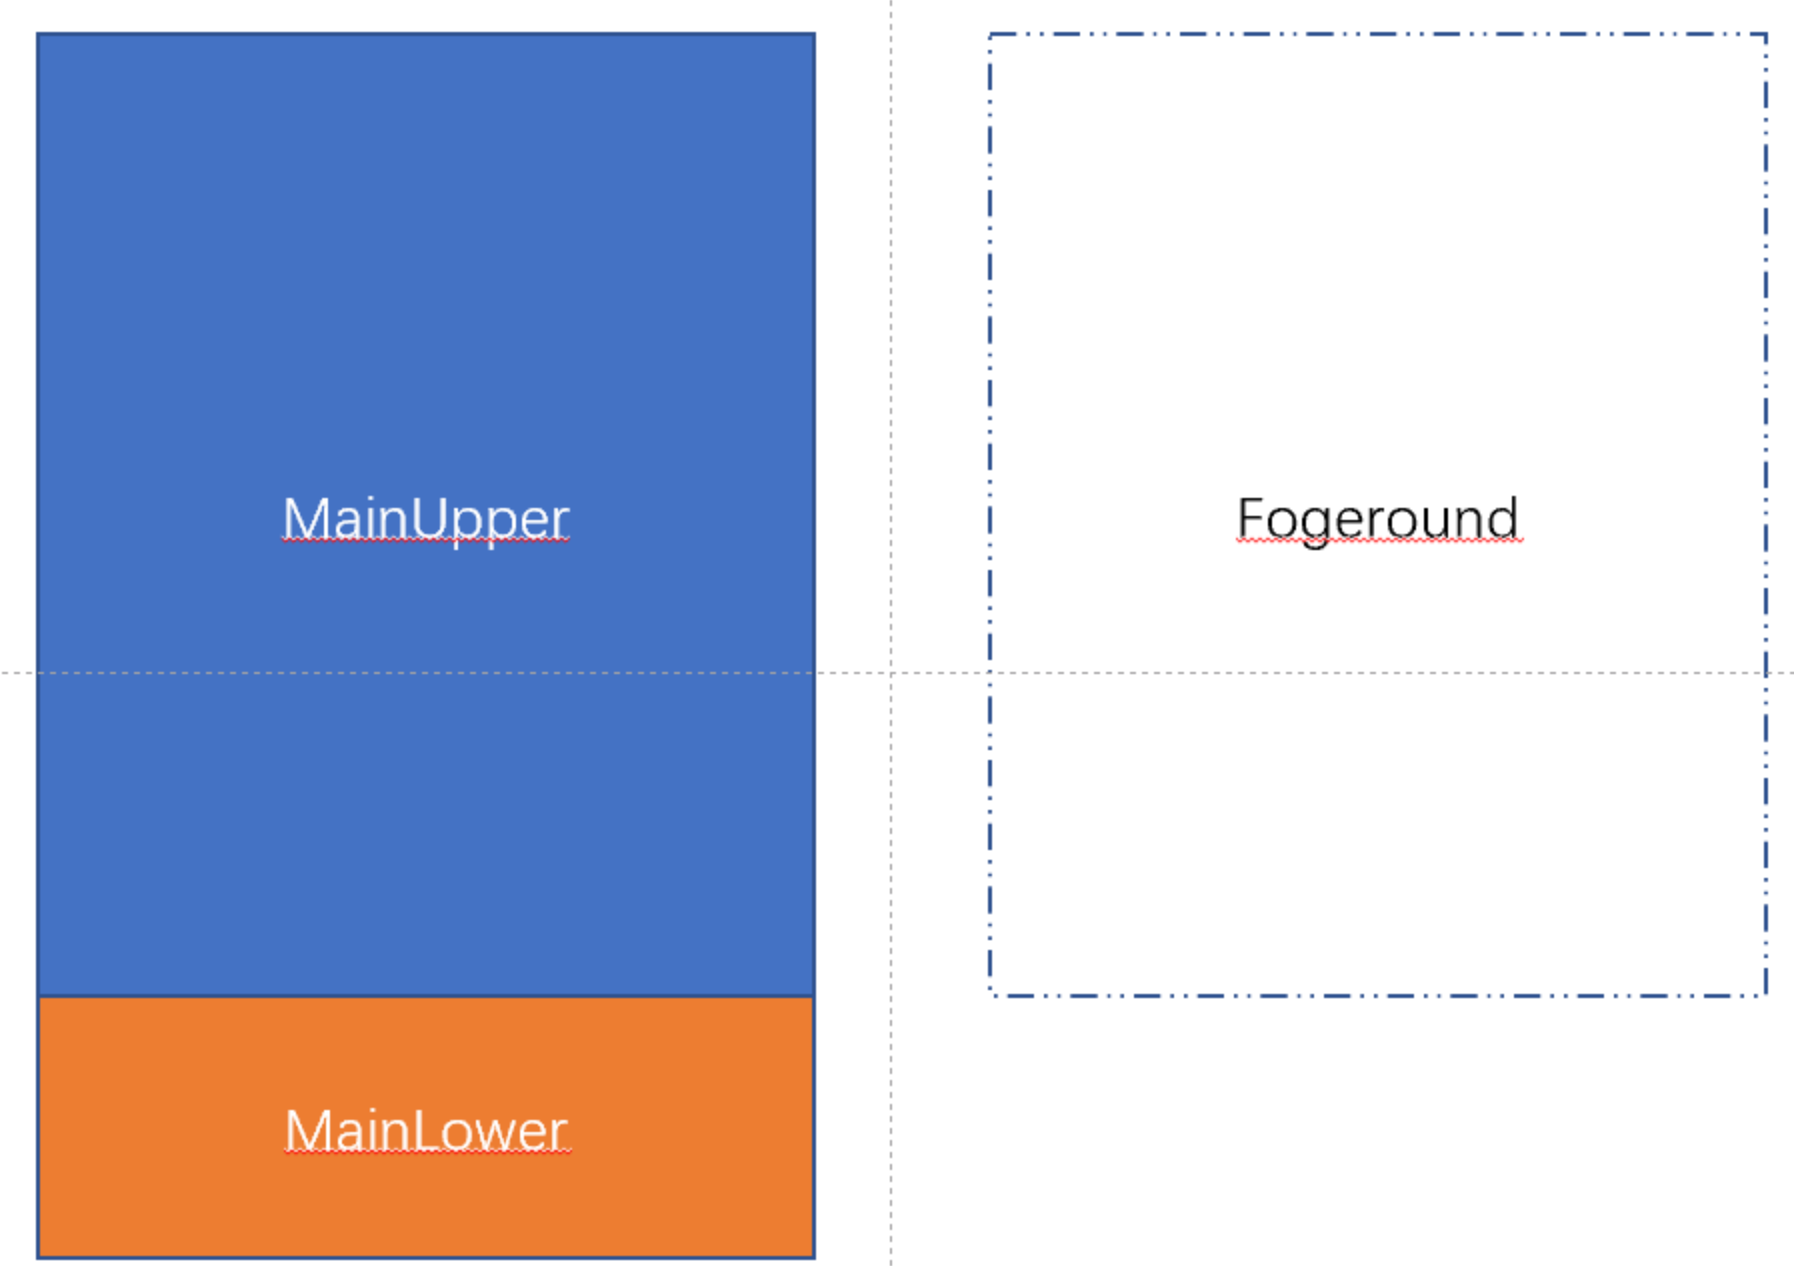
上图所示的应用 中,具体的页面变化如下:
开始时:
页面有一个 Main,其中又分为了 Upper(上面的背景)和 Lower(下面的功能栏) 两个部分,当开始拖动时,前景的初始大小为 MainUpper 的大小(与它重叠)。
拖动时:
随着用户的拖动,之前被隐藏的前景 Foreground 逐渐展开,渐渐淡出;同时背景渐渐隐去,直到最后完成切换。这一过程实际上是 alpha (透明度) 分别从 0 到 1 和 1 到 0 的过程。
结束时:
当用户松手后,当拖动的举例超过一定阈值时,前景 Main 会自动切换到完全展开的状态,而背景则会自动切换到完全隐藏的状态。此处对用户来说,就像是从 Main 切换到了 Foreground 一样。
在此状态下,向上拖动或者侧滑返回应该能够回到 Main 状态,从而比较符合用户的预期。
实现
通过思考要求,我们发现,要知道前景的大小,需要先知道 MainUpper 的大小。这种“子布局大小需要依赖其他子布局来确定”的情景,意味着我们需要使用 SubcomposeLayout。如果你对此不了解,可以参考 SubcomposeLayout | 你好 Compose
那么首先,写个大致的框架出来:
1
2
3
4
5
6
7
8
9
10
11
12
13
| @Composable
fun SwipeCrossFadeLayout(
modifier: Modifier = Modifier,
mainUpper: @Composable () -> Unit,
mainLower: @Composable () -> Unit,
foreground: @Composable () -> Unit,
) {
SubcomposeLayout(modifier = modifier) { constraints ->
layout(..., ...) {
}
}
}
|
SubcomposeLayout 的使用类似于 Layout,最后一个参数为 measurePolicy 用于指定如何测量与放置。它的唯一参数为 constraints 为当前布局的约束条件。
让我们开始实现吧。
测量
第一步是测量。因为此处特殊需求,我希望 MainLower 先被测量,之后 MainUpper 再填满剩下的空间。最后才是根据 MainUpper 的大小测量 Foreground 。我们可以用几个变量保存测量得到的几个大小,编写代码如下:
1
2
3
4
5
6
7
8
9
10
11
12
13
14
15
16
17
18
19
20
21
22
23
24
25
26
27
28
29
30
31
32
33
34
35
36
| @Composable
fun SwipeCrossFadeLayout(
modifier: Modifier = Modifier,
mainUpper: @Composable () -> Unit,
mainLower: @Composable () -> Unit,
foreground: @Composable () -> Unit,
) {
var containerHeight by remember { mutableStateOf(100) }
var mainUpperHeight by remember { mutableStateOf(0) }
var lowerPartHeight by remember { mutableStateOf(100) }
SubcomposeLayout(modifier = modifier) { constraints ->
containerHeight = constraints.maxHeight
val mainLowerPlaceable = subcompose(MainLowerKey, mainLower).first().measure(constraints.copy(
minWidth = 0,
minHeight = 0
))
lowerPartHeight = mainLowerPlaceable.height
val mainUpperPlaceable = subcompose(MainUpperKey, mainUpper).first().measure(constraints.copy(
minWidth = 0,
minHeight = 0,
maxHeight = constraints.maxHeight - lowerPartHeight
))
mainUpperHeight = mainUpperPlaceable.height
layout(..., ...) {
}
}
}
|
到这里,Main 的大小就算完了,接下来就是计算 Foreground 部分的大小了,而这,就需要结合当前拖动的位置动态计算。
我们不妨想一想,为了实现这样的效果,我们需要什么?
- 手势,需要拿到当前的拖动位置
- 超过阈值后松手自动跳转的处理,以及对应的动画
滑动
幸运的是,优秀的 Jetpack Compose 已经为我们提供了 swipeable 修饰符,利用它就可以轻松实现“带有回弹和动画的拖动”效果。如果你不了解,可以参考:滑动(Swipeable) | 你好 Compose。
一些提示:Jetpack Compose 1.6.0-alpha04 将 Swipeable 标记为过时,建议使用 AnchoredDraggable 代替。但截至本文写作时,其相关 API 仍在不断变化,因此本文仍使用 Swipeable。如果您阅读本文时,相关 API 已经稳定,可以考虑使用 AnchoredDraggable。
我们下面通过一个小例子来展示 SwipeableState 的基本用法:
1
2
3
4
5
6
7
8
9
10
11
12
13
14
15
16
17
18
19
20
21
22
23
24
25
26
27
28
29
30
31
32
33
34
35
36
37
38
39
40
41
42
43
44
| private enum class Status {
OPEN, CLOSE
}
@OptIn(ExperimentalMaterialApi::class)
@Composable
fun SwipeableDemo() {
val blockSize = 48.dp
val blockSizePx = with(LocalDensity.current) { blockSize.toPx() }
val swipeableState = rememberSwipeableState(initialValue = Status.CLOSE)
Box(
modifier = Modifier
.size(height = blockSize, width = blockSize * 4)
.background(Color.LightGray)
) {
Box(
modifier = Modifier
.offset {
IntOffset(swipeableState.offset.value.toInt(), 0)
}
.swipeable(
state = swipeableState,
anchors = mapOf(
0f to Status.CLOSE,
blockSizePx * 3 to Status.OPEN
),
thresholds = { from, to ->
if (from == Status.CLOSE) {
FractionalThreshold(0.3f)
} else {
FractionalThreshold(0.5f)
}
},
orientation = Orientation.Horizontal
)
.size(blockSize)
.background(Color.DarkGray)
)
}
}
|
它的运行效果如下:
由于录屏问题,可能动画不是很明显
可以看到,当我们拖动小滑块时,它的 offset 便会被改变;而当我们拖过了某一限度时(threshold),滑块便回自动以动画的形式移动到另一侧。这正是我们所需要的!下面我们用它来继续实现。
考虑到外部应该可以控制前景的显示与关闭,我们把对应的状态放到参数上:
1
2
3
4
5
6
7
8
9
10
11
12
13
14
15
| enum class SwipeShowType {
Main,
Foreground
}
@Composable
fun SwipeCrossFadeLayout(
modifier: Modifier = Modifier,
state: SwipeableState<SwipeShowType> = rememberSwipeableState(SwipeShowType.Main),
mainUpper: @Composable () -> Unit,
mainLower: @Composable () -> Unit,
foreground: @Composable () -> Unit,
){
...
}
|
然后添加 swipeable 修饰符:
1
2
3
4
5
6
7
8
9
10
11
12
13
14
|
SubcomposeLayout(
modifier = modifier.swipeable(
state = state,
anchors = mapOf(
0f to SwipeShowType.Main,
lowerPartHeight.toFloat() to SwipeShowType.Foreground
),
orientation = Orientation.Vertical,
thresholds = { _, _ -> FractionalThreshold(0.3f) }
)
) { constraints ->
}
|
然后就是根据 SwipeableState 的 currentOffset 动态计算前景的高度了,这部分的代码如下:
1
2
3
4
5
6
7
8
9
10
11
12
13
14
15
16
17
18
19
| SubcomposeLayout(modifier = modifier) { constraints ->
val progress = (state.offset.value / lowerPartHeight).coerceIn(0f, 1f)
val foregroundHeight = mainUpperHeight + progress * lowerPartHeight
val foregroundPlaceable = subcompose(ForegroundKey, foreground).first().measure(
constraints.copy(
minWidth = constraints.minWidth,
minHeight = foregroundHeight.toInt(),
maxWidth = constraints.maxWidth,
maxHeight = foregroundHeight.toInt()
)
)
layout(..., ...) {
}
}
|
摆放
最后就是 layout代码的实现,由于要改变 alpha ,因此选用 placeWithLayer 实现。有了上面的 progress,摆放时只需要将 Main 的透明度从 1->0,Foreground 从 0.5->1 (选择 0.5 而不是 0 开始,是因为 0 开始的话,最初的阶段实在看不见)。
1
2
3
4
5
6
7
8
9
10
11
12
13
14
15
16
17
18
19
| layout(constraints.maxWidth, constraints.maxHeight) {
if (progress != 1f) {
mainUpperPlaceable.placeRelativeWithLayer(0, 0) {
alpha = 1f - progress
}
mainLowerPlaceable.placeRelativeWithLayer(0, containerHeight - lowerPartHeight) {
alpha = 1f - progress
}
}
if (progress > 0.01f) {
foregroundPlaceable.placeRelativeWithLayer(0, 0) {
alpha = lerp(0.5f, 1f, progress)
}
}
}
|
你可能注意到,上面的代码加了 if 作为判断,这是因为我希望当切换完成后,整个 Composable 只显示 前景 或者 背景 之一。
我们来写一个简单的例子测试下:
1
2
3
4
5
6
7
8
9
10
11
12
13
14
15
16
17
18
19
20
21
22
23
24
25
26
27
28
29
30
31
32
| @OptIn(ExperimentalMaterialApi::class)
@Composable
fun SwipeCrossFadeLayoutTest() {
val state = rememberSwipeableState(initialValue = SwipeLayoutState.Main)
SwipeCrossFadeLayout(
modifier = Modifier
.fillMaxSize(),
state = state,
mainLower = {
Box(
modifier = Modifier
.fillMaxWidth()
.height(200.dp)
.background(Color.Blue)
)
},
mainUpper = {
Box(
modifier = Modifier
.fillMaxWidth()
.background(Color.Red)
)
},
foreground = {
Box(
modifier = Modifier
.fillMaxSize()
.background(Color.Green)
)
}
)
}
|
运行效果如下:
处理嵌套滑动
其实到这里,这个布局已经基本可用了。但是,如果前景为列表,当前景被展开后,由于滑动事件被列表消费了,因此没法上滑关闭(读者可以将 foreground 的 content 改为 LazyColumn 自行尝试,就能明白我的意思)。
这是因为原本的上拉事件被 LazyColumn 消费,Swipeable 无法获取的相应事件,自然无法拉回去。因此这里我们要手动处理下嵌套滑动的问题。
Jetpack Compose 为嵌套滑动提供了特别的修饰符 .nestedScroll(nestedScrollConnection),具体介绍可以参考 嵌套滑动(NestedScroll) | 你好 Compose。在这里,由于我们要将“列表滑动后多余的偏移量给父布局消费”,因此重写 postScroll 方法,代码如下:
1
2
3
4
5
6
7
8
9
10
11
12
13
14
15
16
17
18
19
20
21
22
23
24
25
26
27
| val nestedScrollConnection = remember {
object : NestedScrollConnection {
override fun onPostScroll(
consumed: Offset,
available: Offset,
source: NestedScrollSource
): Offset {
return if (available.y < 0 && source == NestedScrollSource.Drag) {
state.performDrag(available.toFloat()).toOffset()
} else {
Offset.Zero
}
}
override suspend fun onPostFling(consumed: Velocity, available: Velocity): Velocity {
state.performFling(velocity = Offset(available.x, available.y).toFloat())
return available
}
private fun Float.toOffset(): Offset = Offset(0f, this)
private fun Offset.toFloat(): Float = this.y
}
}
|
然后就完成了~。效果如下:
变种
修改 offset 而不是 height
在刚刚的实现中,我们是通过修改前景的高度来实现的,其实我们也可以保持高度不变,转而修改前景的 Offset
1
2
3
4
5
6
7
8
9
10
11
12
13
14
15
16
17
| - // 测量时固定高度
- val foregroundPlaceable = subcompose(ForegroundKey, foreground).first().measure(
- constraints.copy(
- minWidth = constraints.minWidth,
- minHeight = foregroundHeight.toInt(),
- maxWidth = constraints.maxWidth,
- maxHeight = foregroundHeight.toInt()
- )
- )
+ val foregroundPlaceable = subcompose(FOREGROUND_KEY, foreground).first().measure(
+ constraints.copy(minHeight = constraints.maxHeight, maxHeight = constraints.maxHeight)
+ )
// ...
+ foregroundPlaceable.placeRelativeWithLayer(0, lerp(-mainLowerHeight, 0, progress)) {
+ alpha = progress
+ }
|
前景下拉时背景同时缩小
我们能不能让前景下拉的时候,背景同时缩小呢?答案是当然也可以,只需要设置 scaleX 和 scaleY 即可。同时,为了保持两者在缩放时仍然相连,我们分别设置它们的缩放中心为 centerBottom(Upper) 和 centerTop(Lower)。代码如下:
1
2
3
4
5
6
7
8
9
10
11
12
13
14
15
| layout(constraints.maxWidth, constraints.maxHeight) {
+ val scale = lerp(1f, 0.8f, progress)
mainLowerPlaceable.placeRelativeWithLayer(0, mainUpperHeight) {
alpha = 1f - progress
+ scaleX = scale
+ scaleY = scale
+ transformOrigin = TransformOrigin(0.5f, 0f)
}
mainUpperPlaceable.placeRelativeWithLayer(0, 0) {
alpha = 1f - progress
+ scaleX = scale
+ scaleY = scale
+ transformOrigin = TransformOrigin(0.5f, 1f)
}
|
运行效果如下:
代码
本文的代码可以在 SwipeCrossFadeLayout.kt 找到。如果有帮助,欢迎点个 Star,这对我是很大的鼓舞,谢谢~
本文的部分代码注释由 ChatGPT 完成


 wechat
 alipay