上一篇文章 ,我们接触了固有特性测量。这一篇,我们将探索ParentData
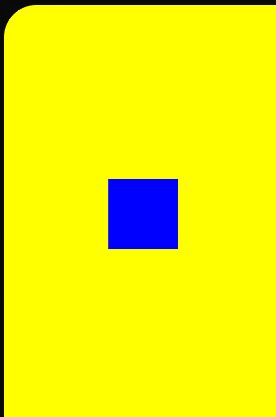
ParentData 曾经的例子 让我们回忆一下第一篇文章中提到的例子,为了实现如下效果
我们当时使用了这样一串修饰符:
1
2
3
4
5
Box(modifier = Modifier .fillMaxSize() .wrapContentSize(align = Alignment.Center) .size(50. dp) .background(Color.Blue))
也就是说,子微件的居中是它自己的wrapContentSize(align = Alignment.Center)调整的结果。那么,如果我们现在知道了子微件(小的蓝色方块)被包裹在另一个方块(Box)里,我们能不能让父布局帮忙确定居中位置呢?
答案是可以的!Box 在其content作用域中提供了align 方法,这可以让子微件自行告知父布局:我需要居中
1
2
3
4
5
6
7
8
9
10
11
12
13
@Composable inline fun Box ( modifier: Modifier = Modifier, content: @Composable BoxScope .() -> Unit ) val measurePolicy = rememberBoxMeasurePolicy(contentAlignment, propagateMinConstraints) Layout( content = { BoxScopeInstance.content() }, measurePolicy = measurePolicy, modifier = modifier ) }
而 BoxScope的源码如下:
1
2
3
4
5
6
7
8
@Immutable interface BoxScope { @Stable fun Modifier.align (alignment: Alignment ) @Stable fun Modifier.matchParentSize () }
作为接口,在此作用域中,子微件就可以调用align告诉父微件自己的align方式了
所以上面的效果这可以这样实现:
1
2
3
4
5
6
7
8
9
10
11
12
13
14
@Composable fun ModifierSample2 () Box(modifier = Modifier .width(200. dp) .height(300. dp) .background(Color.Yellow)){ Box(modifier = Modifier .align(Alignment.Center) .size(50. dp) .background(Color.Blue)) } }
效果是一样的
不像我们之前看到的布局修饰符,align是父级数据修饰符。本质上,这类由子微件向父布局通信就是由parentData实现的。如上面的align最终会涉及到如下代码:
1
2
3
4
5
6
7
8
override val parentData: Any? get () = with(modifier) { layoutNode.measureScope.modifyParentData(wrapped.parentData) }
源码 ParentDataModifier源码如下:
1 2 3 4 5 6 7 8 9 10 11 interface ParentDataModifier : Modifier.Element { fun Density.modifyParentData (parentData: Any ?) }
尝试用用:咸鱼的“地摊” 接下来我们尝试用用它。我们来假想这样一个布局:小咸鱼的地摊
上述描述换成代码的话就是:每一个子微件通过自定义的Modifier定义自身的价格,并把它传递给父布局,父布局计算所有的价格累积在一起,并显示出来。
开始写代码吧。我们先定义一个类,继承自ParentDataModifier
1 2 3 4 class CountNumParentData (var countNum: Int ) : ParentDataModifier { override fun Density.modifyParentData (parentData: Any ?) this @CountNumParentData }
(为了简单起见,我们将modifyParentData这个方法直接返回自身了。在原版Column的实现中,这个方法实际类似这样:
1
2
3
4
5
override fun Density.modifyParentData (parentData: Any ?) ((parentData as ? RowColumnParentData) ?: RowColumnParentData()).also { it.weight = weight it.fill = fill }
)
然后我们编写一个简单的Modifier,返回一个实例
1
2
3
4
fun Modifier.count (num: Int ) this .then( CountNumParentData(num) )
接下来我们复用一下之前的VerticalLayout,只不过在里面读取一下ParentData而已,部分代码如下
1
2
3
4
5
6
7
8
9
10
11
12
13
14
var num = 0 Layout( modifier = modifier, content = content ) { measurables: List<Measurable>, constraints: Constraints -> val placeables = measurables.map { if (it.parentData is CountNumParentData) { num += (it.parentData as CountNumParentData).countNum } it.measure(constraints) } Log.d(TAG, "CountChildrenNumber: 总价格是:$num " ) }
最后运行一下这个例子
1
2
3
4
5
6
7
8
9
10
11
12
13
@Composable fun CountNumTest () CountChildrenNumber { repeat(5 ) { Box( modifier = Modifier .size(40. dp) .background(randomColor()) .count(Random.nextInt(30 , 100 )) ) } } }
对应的总价格输出如下:
你可能注意到了,上面的Box里面还用文字指明了自己的“售价”,但调用的代码却没用到Text。这里的文本又是怎么画的呢?
答案就是刚刚的countModifier,除了作为父级数据修饰符外,它还发挥了修饰自身的作用。它的代码完整如下:
1
2
3
4
5
6
7
8
9
10
11
12
13
14
15
16
fun Modifier.count (num: Int ) this .drawWithContent { drawIntoCanvas { canvas -> val paint = android.graphics .Paint() .apply { textSize = 40F } canvas.nativeCanvas.drawText(num.toString(), 0F , 40F , paint) } drawContent() } .then( CountNumParentData(num) )
这里用到了绘制时的部分内容,如果你感兴趣的话,后面我还可能介绍一下自定义绘制。嗯,挖了个坑,之后再填吧~
ParentData的实际场景主要集中在父布局对子微件的特殊位置和大小的控制上,比如Box的align,Column和Row的align、alignBy、weight上。接下来我们来实现一个简化版的weight吧
尝试用用:实现简易版weight 为了简易起见,我们实现的weight有如下限制:
所有子微件都有weight,按比例实现高度分配
父布局的宽高是确定的
所以代码的逻辑就是:读取所有weight,按比例分配高度就行。
首先类似于Box,我们也写一个VerticalScope,让我们自定义的weight只能在自定义的布局中使用
1
2
3
4
interface VerticalScope { @Stable fun Modifier.weight (weight: Float ) }
然后再自定义我们的ParentDataModifier
1
2
3
class WeightParentData (val weight: Float =0f ) : ParentDataModifier { override fun Density.modifyParentData (parentData: Any ?) this @WeightParentData }
写一个object,让它实现我们的VerticalScope
1
2
3
4
5
6
object VerticalScopeInstance : VerticalScope { @Stable override fun Modifier.weight (weight: Float ) this .then( WeightParentData(weight) ) }
接下来,就是具体的Composable实现了。注意,在此处,我们的content需要加上VerticalScope.
1
2
3
4
5
@Composable fun WeightedVerticalLayout ( modifier: Modifier = Modifier, content: @Composable VerticalScope .() -> Unit )
具体实现类似于之前的VerticalLayout,不同之处在于我们要获取到各个WeightParentData的值并保存下来,计算总的weight。这样就可以按比例分配高度了。
关键代码如下:
1
2
3
4
5
6
7
8
9
10
11
12
13
14
15
16
17
18
19
20
21
val measurePolicy = MeasurePolicy { measurables, constraints -> val placeables = measurables.map {it.measure(constraints)} val weights = measurables.map { (it.parentData as WeightParentData).weight } val totalHeight = constraints.maxHeight val totalWeight = weights.sum() val width = placeables.maxOf { it.width } layout(width, totalHeight) { var y = 0 placeables.forEachIndexed() { i, placeable -> placeable.placeRelative(0 , y) y += (totalHeight * weights[i] / totalWeight).toInt() } } } Layout(modifier = modifier, content = { VerticalScopeInstance.content() }, measurePolicy=measurePolicy)
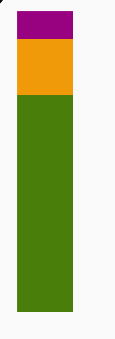
测试一下?我们预备让三个Box按1:2:7的高度显示
1 2 3 4 5 WeightedVerticalLayout(Modifier.padding(16. dp).height(200. dp)) { Box(modifier = Modifier.width(40. dp).weight(1f ).background(randomColor())) Box(modifier = Modifier.width(40. dp).weight(2f ).background(randomColor())) Box(modifier = Modifier.width(40. dp).weight(7f ).background(randomColor())) }
最终效果如下,可以看到,三个Box正确按照1:2:7的比例显示高度
成功!
后续 关于ParentData我们就先看这些。下一篇,我们……等我想想要写啥
本文参考:
本文所有代码见:此处 ,欢迎star~


